

How To Set Up A Shared Outlook Calendar
Share your Microsoft 365 or Outlook.com calendar with people inside or outside your organization
-
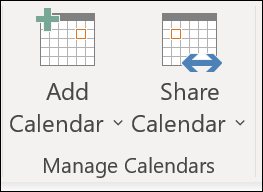
From your Calendar folder, on the Home menu, select Share Calendar.
-
Cull the agenda you lot want to share from the drop-down menu.
-
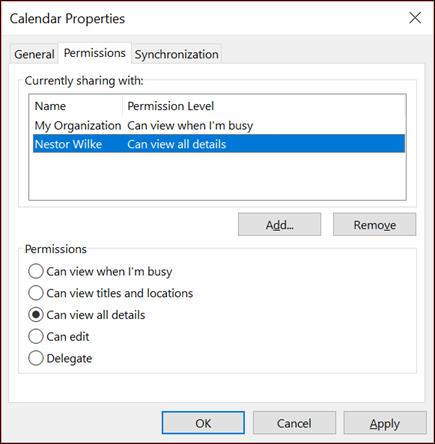
In the Calendar Properties dialog box, click Add together.
-
You can search for people from your address book or type in their email addresses in the Add box. When yous're washed adding names in the Add Users dialog box, click OK.
-
Back in the Calendar Properties dialog box, select the person'southward proper noun or email address, then choose the level of details that you want to share with the person, then click OK.
-
The person y'all've shared your agenda with will receive a sharing invitation past email.
-
Once the recipient clicks Accept, they'll see your shared agenda in their calendar listing.
I run into a "This calendar can't be shared" error
If you see a message that says This calendar tin can't be shared, there are 3 possible reasons.
-
The email accost is invalid.
-
The email address is an Microsoft 365 Group
-
The email belongs to an external user who isn't part of your organisation.
What permissions people take to your calendar
You can choose from several different permission levels when sharing your calendar.
-
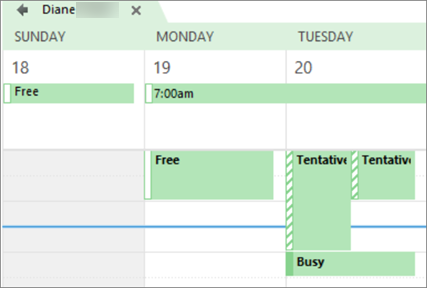
Can view when I'm decorated. Those sharing your calendar with this permission level tin can only come across which times you're bachelor, like this:
-
Tin can view titles and locations. Those sharing your calendar with this permission level volition encounter availability and the subject and meeting location, similar this:
-
Can view all details. Those sharing your calendar with this permission level will come across all details of your appointments, just like what you see.
Stop sharing your calendar
At whatsoever time you can revoke access to your calendar. Note that it may take a while for Microsoft 365 and the user's Outlook to sync and remove the view to your agenda.
-
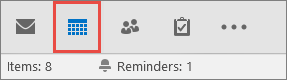
Click Calendar.
-
Click Domicile > Agenda Permissions.
-
On the Permissions tab, click the user'southward proper name then choose Remove.
-
Click OK.
Share a agenda past publishing information technology to a web page
If you have access to a web server that supports the Www Distributed Authoring and Versioning (WebDAV) protocol, you lot can publish your calendar in that location.
Annotation:Not sure if your server supports WebDAV? Your server administrator or internet access provider (Internet access provider) should be able to tell you.
-
Click Calendar.
-
Click Home > Publish Online > Publish to WebDAV Server.
Notes:
-
If your email account uses Exchange, you will see Publish This Calendar, instead of the option to publish to a WebDAV server. This lets y'all publish your calendar directly to an Exchange Server. In the window that opens, select the publishing options you want, and click Start Publishing.
-
If yous're using Microsoft 365, y'all can still publish your calendar to a WebDAV server, only y'all must kickoff remove {Anonymous:CalendarSharingFreeBusySimple} from the sharing policy. This will prevent you lot from publishing your agenda to Commutation in the time to come, yet.
-
-
In the Location box, enter the location of the WebDAV server, select any other publishing options you desire, and so click OK.
Share your calendar in an electronic mail
If yous don't desire to requite someone permissions to share your calendar and meet updates, you tin email a static copy of your calendar for a specific engagement range. The recipient will be able to see the events on your calendar at the time you lot sent the email, but not any updates yous make afterwards you send the e-mail.
Note:This feature is no longer available with Outlook for Microsoft 365.
-
Click Calendar.
-
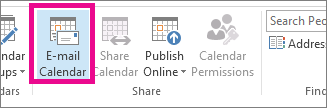
Click Dwelling > E-post Calendar.
-
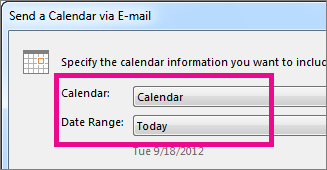
In the Calendar and Date Range boxes, selection the calendar and time period you want to share. For example, choose Today only or for the Next 7 days.
-
Gear up whatsoever other options you want, and then click OK.
-
In the new e-mail that opens, add who you lot want the message to go to in the To field, add a message if you lot want, and click Ship.
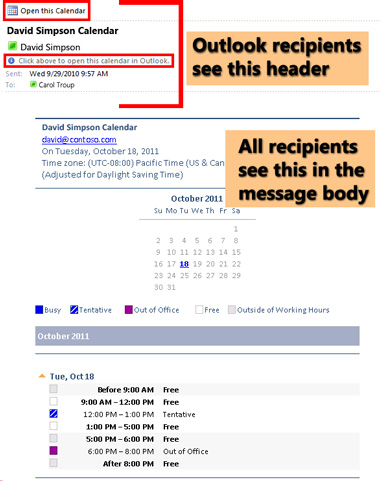
The person yous sent your calendar to will see a snapshot of your agenda in the message.
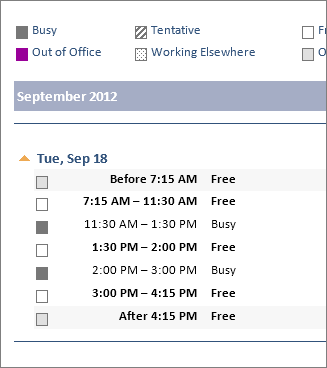
The message also includes an fastened iCalendar (.ics) file that they tin open up in Outlook or another calendar program. When the recipient clicks the iCalendar file, Outlook displays the file as a new calendar that they can view side-by-side with their calendar. They can drag appointments or meetings between the two calendars, and observe a fourth dimension that works for both of you.
Set up bug sharing your calendar
If you lot don't take the option to share your agenda (it'due south greyed out), it's because the admin/IT support for your business concern has set a policy to forbid the people from sharing calendars.
Encounter also
Sharing your calendar in Outlook Web App
Yous tin share calendar information with other people by using Outlook 2010 in three ways:
-
By email
-
With Microsoft Exchange Server accounts
-
Past publishing a agenda online
What exercise you lot want to exercise?
-
Share calendars by electronic mail
-
Share calendars using a Microsoft Exchange Server business relationship
-
Share a calendar by publishing it online
Share calendars by electronic mail
Calendars shared by email arrive in the recipient'southward Inbox as electronic mail message attachments, with a Calendar Snapshot in the message trunk. You tin edit the Calendar Snapshot before sending. For example, you tin can change fonts or highlight days or appointments.
To send a agenda by email:
-
On the Home tab, in the Share group, click Email Calendar.
-
In the Agenda box, click the calendar that you desire to transport.
-
In the Date Range box, click the fourth dimension period that you lot desire the calendar to show.
-
Enter or select whatsoever other options that you want, and then click OK.
An Outlook 2010 user who receives the Agenda by email can choose to open the Calendar Snapshot in Outlook. Doing so tin display the Calendar Snapshot and the recipient's electric current calendar in side-by-side style or calendar overlay way.
Share calendars using a Microsoft Exchange Server account
Microsoft Substitution Server enables agenda sharing with others who accept Exchange accounts. Your calendars can be viewed just past others to whom you take granted permissions. If the other person whose calendar you want to open has not granted you permission to view it, Outlook prompts you to ask the person for the permission that you need.
After yous access a shared agenda for the first time, the calendar is added to the Shared Calendars list in the Navigation Pane, where you can access information technology the next time that you want to view it.
To share your calendar with another Exchange user:
-
On the Home tab, in the Share group, click Share Calendar.
-
In the Sharing Invitation that appears, enter the person who you want to share with in the To box.
-
Enter or select any other options that y'all desire, simply as if y'all were sending an electronic mail bulletin.
The recipient sees an email notification that you have shared your calendar. Yous tin also asking that the recipient share his or her Exchange Agenda with y'all.
Tip:If yous desire to share a calendar that you lot created that is non your default Calendar, in the Navigation Pane, right-click the calendar proper name, and then click Share calendar name.
Share a calendar by publishing information technology online
Y'all can publish your default Outlook 2010 Calendar to the Internet, which enables more people to view information technology. Publishing an Internet Agenda requires neither the publisher nor the user to use an Exchange business relationship.
-
Publish to Outlook.com You lot can share your Outlook agenda with others by publishing it on Outlook.com.
To share your Outlook agenda on Outlook.com, first salvage information technology every bit an iCalendar (.ics file), import information technology into Outlook.com, then share it with the people who need to see it.
Salvage a calendar equally an .ics file by selecting the calendar in Outlook, clicking File > Salvage Calendar, and choosing the iCalendar Format file type.
Don't have an Outlook.com business relationship? Learn how to create one at Outlook.com.
-
Publish to a WebDAV server If you have admission to a spider web server that supports the World Wide Web Distributed Authoring and Versioning (WebDAV) protocol, you tin can choose to publish calendars to that server instead.
In your default agenda, on the Home tab, in the Share group, click Publish Online, and then click Publish to WebDAV Server.
Your Internet service provider (Isp) might provide features and tools to enable you to publish your agenda as a webpage. Contact your Isp to verify whether that feature is available to you.
Come across also
Open up another person'due south Exchange Calendar
Allow someone else to manage your post and calendar
Create, view, or delete a calendar group
Manage another person's post and calendar items
Of import: Part 2007 is no longer supported. Upgrade to Microsoft 365 to piece of work anywhere from any device and continue to receive support.
Upgrade now
You can share a one-fourth dimension copy of your agenda that is non updated called Agenda Snapshots or share calendars that can be updated by publishing them to web sites that back up the WebDAV protocol.
What do you want to do?
-
Share your agenda with other Substitution users
-
Share calendars with anyone
-
Publish a calendar to Office Online
Share your calendar with other Exchange users
This characteristic requires you to apply a Microsoft Commutation Server 2000, Exchange Server 2003, or Substitution Server 2007 account. Most home and personal accounts do not use Microsoft Exchange. For more information near Microsoft Substitution accounts and how to determine which version of Exchange your account connects to, come across the links in the Run across Too section.
In this department
-
Share your default Calendar folder with specific people
-
Share your default Agenda binder with everyone
-
Share a custom calendar folder with specific people
-
Share a custom calendar folder with everyone
-
Revoke or modify other people's access to your calendar folders
-
Share your calendar by using Consul Access
For information on requesting admission to someone else's shared agenda, see Open another person'due south Commutation Calendar.
Share your default Calendar binder with specific people
The default Agenda folder in Outlook is created in each Outlook contour. This folder cannot be renamed or deleted.
-
In Calendar, in the Navigation Pane, click Share My Calendar.
Note:If you lot are using the Navigation Pane in Minimized view, in the Navigation Pane, click
 , click Navigation Pane, and and so click Share My Agenda.
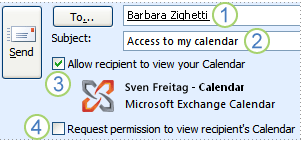
1. Enter the proper noun of the person that y'all want to grant access to view your agenda.
2. Type a field of study for your electronic mail message.
3. Click this cheque box to grant the recipient permission to view your calendar.
4. Click this check box to specify that you want to ask the recipient to share his or her calendar with you. This is optional.
-
In the To box, enter the name of the recipient for the sharing invitation message.
-
In the Subject area box, type a subject for the e-mail bulletin.
-
In addition, you can request permissions to view the recipient'south default Agenda folder. To do and then, select the Request permission to view recipient'southward Calendar check box.
Note:If y'all want to asking access to a calendar folder other than the default Calendar folder, you must send an e-mail message request for permissions to that particular folder. This option requests access to the recipient'southward default Calendar binder only.
-
In the message torso, type any information that you want to include.
-
Click Send.
-
Review the confirmation dialog box, and then, if correct, click OK.
Top of Page
Share your default Calendar folder with anybody
The default Calendar folder in Outlook is created in each Outlook profile. This folder cannot be renamed or deleted.
-
In Calendar, in the Navigation Pane, right-click the default Agenda binder.
This is ordinarily under My Calendar, and is displayed as Calendar.
Note:If yous are using the Navigation Pane in Minimized view, in the Navigation Pane, click
, click Navigation Pane, right-click the calendar that you desire to share, and then click Share calendar name.This is usually under My Calendars and is displayed as Agenda.
-
Click Change Sharing Permissions.
-
On the Permissions tab, in the Name box, click Default.
-
Nether Permissions, in the Permission Level listing, click a permission level.
With this permission level (or office)
You tin
Owner
Create, read, modify, and delete all items and files, and create subfolders. Equally the folder possessor, you can change the permission levels that other people have for the folder. (Does non apply to delegates.)
Publishing Editor
Create, read, modify, and delete all items and files, and create subfolders. (Does not apply to delegates.)
Editor
Create, read, modify, and delete all items and files.
Publishing Writer
Create and read items and files, create subfolders, and alter and delete items and files that you create. (Does not apply to delegates.)
Author
Create and read items and files, and modify and delete items and files that you create.
Contributor
Create items and files but. The contents of the folder do non appear. (Does not apply to delegates.)
Reviewer
Read items and files only.
Custom
Perform activities defined by the folder possessor. (Does not utilize to delegates.)
None
Yous have no permission. Y'all cannot open up the folder.
You tin can create custom permissions past selecting the appropriate check boxes and options under Permissions.
Top of Page
Share a custom calendar folder with specific people
The default Agenda folder in Outlook is created in each Outlook contour. This binder cannot be renamed or deleted. You can create boosted calendar folders and these folders can be renamed or deleted. This section includes instructions to share calendar folders that you create.
-
In Calendar, in the Navigation Pane, right-click the calendar folder that you desire to share.
Note:If y'all are using the Navigation Pane in Minimized view, in the Navigation Pane, click
, click Navigation Pane, right-click the agenda that y'all desire to share, so click Share calendar name. -
Click Share binder name.
-
In the To box of the sharing invitation, enter the name of the recipient.
-
Optionally, change the Subject.
-
In addition, if y'all want to, grant permissions to the recipient to change your calendar items by selecting theRecipient tin can add, edit, and delete items in this Agenda check box.
-
In the message body, blazon any information that you want to include.
-
Click Transport.
-
Review the confirmation dialog box, and and so, if correct, click OK.
Top of Page
Share a custom calendar folder with everyone
The default Calendar folder in Outlook is created in each Outlook profile. This folder cannot exist renamed or deleted. You can create additional agenda folders and these folders can exist renamed or deleted. This section includes instructions to share calendar folders that you create.
-
In Calendar, in the Navigation Pane, right-click the calendar folder that you want to share.
Annotation:If you are using the Navigation Pane in Minimized view, in the Navigation Pane, click
, click Navigation Pane, right-click the calendar that you want to share, and so click Share calendar name. -
Click Change Sharing Permissions.
-
On the Permissions tab, in the Name box, click Default.
-
Under Permissions, in the Permission Level listing, click a permission level.
With this permission level (or role)
Y'all can
Possessor
Create, read, alter, and delete all items and files, and create subfolders. Every bit the folder owner, you lot tin modify the permission levels that other people have for the binder. (Does not employ to delegates.)
Publishing Editor
Create, read, alter, and delete all items and files, and create subfolders. (Does non employ to delegates.)
Editor
Create, read, modify, and delete all items and files.
Publishing Author
Create and read items and files, create subfolders, and modify and delete items and files that you create. (Does not apply to delegates.)
Author
Create and read items and files, and alter and delete items and files that you create.
Contributor
Create items and files only. The contents of the folder do not appear. (Does not apply to delegates.)
Reviewer
Read items and files just.
Custom
Perform activities defined by the folder owner. (Does not apply to delegates.)
None
You have no permission. You cannot open up the folder.
Yous tin create custom permissions past selecting the appropriate check boxes and options under Permissions.
Top of Page
Revoke or change other people'southward access to your calendar folders
At any time, you lot can change or revoke someone's access permissions to your calendar folders.
-
In Calendar, in the Navigation Pane, right-click the calendar binder for which yous want to change permissions.
Annotation:If you lot are using the Navigation Pane in Minimized view, in the Navigation Pane, click
, click Navigation Pane, right-click the calendar for which you desire to change permissions, and then click Modify Sharing Permissions. -
Do one of the following:
-
Revoke or change access permissions for everyone
-
On the Permissions tab, in the Name box, click Default.
-
Under Permissions, in the Permission Level list, click None to revoke permissions or whatsoever of the other options to change permissions.
With this permission level (or role)
Y'all can
Owner
Create, read, alter, and delete all items and files, and create subfolders. Every bit the folder possessor, y'all can modify the permission levels that other people have for the folder. (Does not apply to delegates.)
Publishing Editor
Create, read, modify, and delete all items and files, and create subfolders. (Does non apply to delegates.)
Editor
Create, read, modify, and delete all items and files.
Publishing Author
Create and read items and files, create subfolders, and modify and delete items and files that yous create. (Does not utilize to delegates.)
Author
Create and read items and files, and modify and delete items and files that you create.
Contributor
Create items and files merely. The contents of the folder practice not appear. (Does non use to delegates.)
Reviewer
Read items and files only.
Custom
Perform activities defined by the folder possessor. (Does non apply to delegates.)
None
You have no permission. Y'all cannot open up the binder.
Yous can create custom permissions past selecting the advisable check boxes and options under Permissions.
-
-
Revoke or change permissions for one person
-
On the Permissions tab, in the Name box, click the name of the person whose access permissions you want to modify.
-
Under Permissions, in the Permission Level listing, click None to revoke permissions or whatever of the other options to change permissions.
With this permission level (or role)
You can
Owner
Create, read, alter, and delete all items and files, and create subfolders. Equally the folder owner, y'all tin can change the permission levels that other people have for the folder. (Does non employ to delegates.)
Publishing Editor
Create, read, modify, and delete all items and files, and create subfolders. (Does non employ to delegates.)
Editor
Create, read, modify, and delete all items and files.
Publishing Author
Create and read items and files, create subfolders, and modify and delete items and files that you create. (Does non apply to delegates.)
Author
Create and read items and files, and modify and delete items and files that yous create.
Contributor
Create items and files only. The contents of the folder practice not appear. (Does not apply to delegates.)
Reviewer
Read items and files merely.
Custom
Perform activities defined by the binder owner. (Does non apply to delegates.)
None
Yous take no permission. You cannot open the folder.
You can create custom permissions by selecting the appropriate check boxes and options under Permissions.
-
Echo stride 2 for each person whose admission permissions you want to modify.
-
-
Acme of Folio
Share your calendar by using Delegate Access
Like to having an assistant assistance you manage your incoming newspaper post, you can utilize Microsoft Outlook to allow another person, known as a consul, to receive and respond to meeting requests or responses and to ship e-mail messages on your behalf. You can also grant additional permissions that allow your consul to read, create, or have full control over items in your Exchange mailbox.
Consul Admission is a more than avant-garde feature than merely sharing your Outlook folders. If you desire to grant additional permissions, such as allowing a consul the ability to create e-mail letters or respond to coming together requests on your behalf, you must apply Consul Admission.
Notes:
-
As the manager, your mail must be delivered to your mailbox on the Exchange server, non to a Personal Folders file (.pst) on your estimator.
-
You and the delegate must apply the same version of Function Outlook.
-
On the Tools card, click Options, and so click the Delegates tab.
-
Click Add together.
-
In the Type proper name or select from list box, enter the name of the delegate to whom you want to grant permissions.
To add together multiple delegates simultaneously, concur down CTRL and click their names in the Name list. The permissions yous select will apply to all of the delegates.
-
Click Add, click OK, and and so click a type of permission for each Outlook binder to which you want the consul to accept access.
-
If you desire your delegate to run across items that you have marked private, select the Delegate can see my private items cheque box.
Note:For additional information about Delegate Access, run across the Run across Also section.
Top of Page
Share calendars with anyone
Whether you use a Microsoft Exchange, POP3, IMAP, or Windows Live Mail account, yous can share calendar information with anyone who has access to email or to the Net. In this section:
Save a calendar every bit an iCalendar file
Publish a calendar to a Web server
Relieve a calendar as a Web page
Ship your calendar via email
Relieve a calendar every bit an iCalendar file
-
In Calendar, select a calendar to make information technology the active agenda in the view.
-
On the File menu, click Save As.
-
Type a proper name for the iCalendar file in the File name text box. This should be an easy to recognize and meaningful name for yous and your recipients.
A summary of the calendar name, appointment range, and detail level appears adjacent to More Options. If y'all are satisfied with this summary, proceed to step 8, otherwise keep with step iv.
-
Click More Options.
-
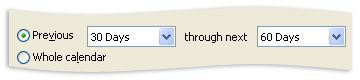
From the Engagement Range list, cull the amount of calendar information to include in the iCalendar file, or click Specify dates to enter a custom date range.
Annotation:If you cull a large date range or select Whole calendar, you might create a large iCalendar file.
-
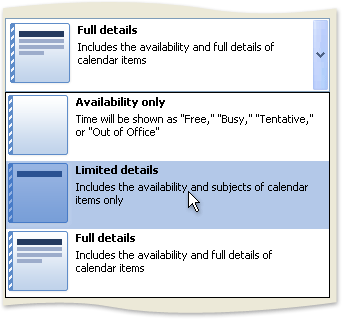
From the Detail listing, choose the amount of detail to show the recipients. By default, the Availability only selection is selected. None of the options include your items marked individual unless you change the privacy pick in Advanced options.
-
Optionally, click Show to see Advanced options.
-
Include details of items marked private This option requires Particular to be ready to Express Details or Total Details. The existence of private items volition exist included, but no further data will be shared.
-
Include attachments within agenda items This selection requires Item to be set to Full Details. All attachments on calendar items, such as spreadsheets, are included.
Notation:This might increase the size of the iCalendar file significantly.
-
-
Click OK, and so click Salvage.
If your calendar contains no items, a dialog box appears to provide you with a hazard to cancel saving the iCalendar file.
Pinnacle of Page
Publish a calendar to a WebDAV server
You can publish and share your calendars with others by publishing them to a WebDAV server. This is useful if you want to share calendars and availability data with others, but do non use a software application such as Exchange.
The server that you are publishing a agenda to must support the World wide web Distributed Authoring and Versioning (WebDAV) protocol. Not all Web servers back up WebDAV. Even if you can use File Transfer Protocol (FTP) or directly save to a universal naming convention (UNC) path such every bit \\server\teamdocuments this does non betoken that WebDAV is available.
WebDAV is an extension of HTTP that enables you lot to create and modify documents on a Spider web server. Your server administrator or Net service provider (ISP) tin tell you lot if WebDAV is supported on the server y'all want to utilize.
-
In Calendar, in the Navigation Pane, right-click the calendar that you want to share.
-
On the shortcut menu, betoken to Publish to Internet, and and so click Publish to WebDAV Server.
-
In the Location box, type the location of the WebDAV server and binder.
-
Next to Time Span, select the number of days for which yous want to share your agenda.
-
Next to Item, click the pointer and choose the amount of item to share. If y'all want, select the Show time within my working hours merely check box to restrict shared details to your working hours specified in Outlook.
By default, this calendar will be periodically updated. Changes to the calendar are published to the WebDAV server during the adjacent manual or automatic send/receive. Past default, at that place is a 30 infinitesimal interval between each ship/receive for each Send/Receive group. If y'all change the automatic send/receive interval to less than 20 minutes, calendar updates to the WebDAV server are sent at a minimum twenty infinitesimal interval.
To upload this agenda and then never provide updates, click Avant-garde, and then click Single Upload: Updates volition non be uploaded.
-
Click OK.
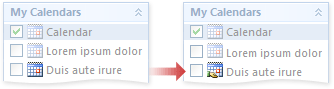
After sharing a calendar, the calendar icon in the Navigation Pane changes every bit shown below.
Pinnacle of Page
Salvage a agenda as a Web page
You can save a calendar as a Web page and then share it with others. For case, you might post a calendar with important project dates as a page on your company's intranet, or your soccer team's game schedule every bit a page on your personal Web site. You tin then easily refer others to the calendar by distributing its URL.
When you salve a agenda as a Web page, yous tin can specify the first and cease dates for the calendar, and whether to include appointment details that are entered in the text department of the engagement. You can besides add a background.
If your Internet access provider (Internet service provider) provides you with a Web site or a place to share files with the public, you can share your calendar as a Spider web page.
-
In Calendar, select a calendar to make it the active calendar in the view.
-
On the File carte du jour, click Save As Spider web Page.
-
Under Duration, enter a date in the Commencement date and Terminate date boxes. Click the down arrow for a calendar.
The default is the electric current and following month.
-
Under Options, you can choose to include details of your appointments or pick a background graphic for the Web page that you are creating.
-
Nether Save As, in the Calendar championship text box, blazon the name that you desire to announced equally the title of the Web page.
-
For File name, scan to the location where you want to relieve the Web folio and then type a file name.
-
By default, the Web folio opens in your Web browser after you click Salve. If yous do not desire to see the Web page, articulate the Open up saved Web page in browser check box.
-
Click Save.
Note:In some Web browsers, such as Microsoft Windows Internet Explorer, the folio might not announced equally information technology should because active content is blocked. If you see an InfoBar at the meridian, click the text, click Allow Blocked Content, and and so click Yes.
Top of Page
Ship your agenda via east-mail
A copy of your agenda can exist sent to anyone in an electronic mail message. The calendar is included as an zipper and as well appears within the message body. You lot decide what dates are included and the corporeality of detail.
-
In Calendar, in the Navigation Pane, click Transport Calendar via Email.
Note:If you are using the Navigation Pane in Minimized view, in the Navigation Pane, click , click Navigation Pane, right-click the agenda that yous want to share, and then click Send Calendar via E-mail.
-
In the Calendar list, choose the calendar to transport. By default, the default Calendar is chosen. This is the Outlook agenda that is used to display your free/decorated information to others and where coming together requests are accustomed.
-
In the Date Range list, cull the amount of agenda information to include in your message, or click Specify dates to enter a custom date range.
Note:If you lot choose a large date range or select Whole calendar, you might create a large message.
-
In the Detail list, choose the amount of detail to prove the recipients. Past default, the Availability only option is selected. None of the options include your items marked private unless y'all modify the privacy choice in Advanced options.
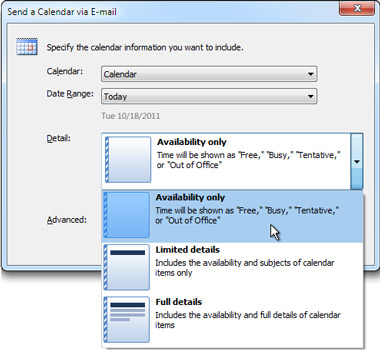
-
Optionally, you tin restrict the data included in the message to your working hours by selecting the Merely show time within my working hours cheque box. To change your working hours, click Set working hours.
-
Optionally, to see avant-garde options, click Bear witness.
-
Include details of items marked private This option requires Detail to be set to Limited Details or Full Details. The existence of private items is included, but no further information is shared.
-
Include attachments within calendar items This option requires Particular to exist gear up to Full Details. All attachments on calendar items, such as spreadsheets, are included.
-
E-mail Layout You can include your Daily schedule or a List of events.
-
-
Click OK.
-
In the To box, enter the name of the person to whom you want to ship the subscription information.
-
In the message torso, enter any information you want to include.
-
Click Transport.
-
The calendar appears to the recipient within the message body. The attached iCalendar file with a file extension of .ics can too be opened in many calendar programs, including Outlook.
When an .ics file attachment is received in Outlook, the recipient is prompted to open the calendar. An .ics calendar file opens equally a new calendar inside Outlook. When opened as an Outlook calendar, the recipient tin view the received calendar in side-by-side or overlay views. The recipient can also elevate calendar items from the received calendar to another Outlook calendar.
Acme of Page
Publish a calendar to Role Online
You can share your Outlook calendars by publishing them to Microsoft Office Online. Office Online provides a free way to share calendars and lets you lot control who has admission to them. Furthermore, you can publish or view calendars on Office Online even if you do not utilise an Commutation business relationship. Using Office Online is a great way to share calendar information if you use POP3 or IMAP electronic mail accounts, the most common types of personal or small business email accounts.
-
In Calendar, in the Navigation Pane, right-click the calendar you want to publish.
Note:If you lot are using the Navigation Pane in Minimized view, in the Navigation Pane, click the Calendar button
, click Navigation Pane, and and then right-click the calendar yous want to publish.Tip:If you want to publish your default calendar, click Publish My Calendar in the Navigation Pane, and then proceed with pace 3.
-
On the shortcut carte, betoken to Publish to Internet, and then click Publish to Office Online.
-
If this is the beginning time you have published a calendar to Role Online, y'all must register for Office Online by using your Windows Live ID account. If y'all exercise not have a free Windows Alive ID account, you can create one. Follow the instructions on your screen.
-
Next to Time Bridge, select the number of days for which you lot want to share your agenda.
-
Next to Detail, click the arrow and cull the amount of detail to share. If yous want, select the Show time within my working hours only check box to restrict shared details to your working hours specified in Outlook.
-
Next to Permissions, cull whether your agenda information tin can be viewed by specified people only or searched and viewed by anyone using Office Online.
-
Only invited users can view this agenda If you click this option, an Outlook sharing electronic mail message opens after the agenda is published to Part Online. You can transport the sharing electronic mail message to each person to whom who you want to grant access to your calendar. The sharing bulletin automatically includes a link to the calendar and you tin type a bulletin if you want to.
-
Anyone can view and search for this agenda on Function Online If yous click this option, anyone who knows the link to your calendar tin view it. People practice not demand a Windows Live ID account to log on or sign in to a service. In improver, Office Online users can discover this agenda when searching for calendars.
-
-
If you lot are publishing a calendar that anyone can view and search, type a description of your calendar in the Description box. This information helps other Office Online users discover your calendar.
By default, this agenda will be periodically updated. Changes to the calendar are published to Office Online during the next manual or automatic send/receive. By default, at that place is a 30-minute interval between each transport/receive for each Transport/Receive grouping. If you alter the automatic send/receive interval to less than 20 minutes, calendar updates to Office Online are sent at a minimum interval of 20 minutes.
To upload this agenda and then never provide updates, click Advanced, so click Single Upload: Updates volition not exist uploaded.
-
Click OK.
After sharing a agenda, the calendar icon in the Navigation Pane changes equally shown below.

How To Set Up A Shared Outlook Calendar,
Source: https://support.microsoft.com/en-us/office/share-an-outlook-calendar-with-other-people-353ed2c1-3ec5-449d-8c73-6931a0adab88
Posted by: johnsonhicagaver.blogspot.com
0 Response to "How To Set Up A Shared Outlook Calendar"
Post a Comment