

How To Change Project Settings In Premiere Pro
I of the fundamentals of editing is knowing how to alter your image's resolution and aspect ratio in Premiere Pro.
You should know the frame size (resolution) and shape of the frame (attribute ratio) earlier starting a project (fifty-fifty before shooting).
This is essential for your final delivery -like YouTube, Vimeo, Instagram, Film Festival, Picture palace Project, etc.
Resolution and attribute ratio are tightly interrelated.
Today nosotros'll see how to quickly alter the aspect ratio and resolution rapidly inside Premiere Pro…
…For brand new and existing sequences.
Without wasting time…
Let's become started!
You tin change the resolution:
1. While creating a new sequence – when you are going to first a new timeline for editing.
2. For already existing sequence – when you are in the middle of editing.
How to Alter Resolution in Premiere Pro For a New Sequence?
- Create a new Sequence by going to "File" -> "New" -> "Sequence". (Shortcut for new sequence is "Ctrl + Northward" or "Cmd + N").
- The "New Sequence" window will open up up.
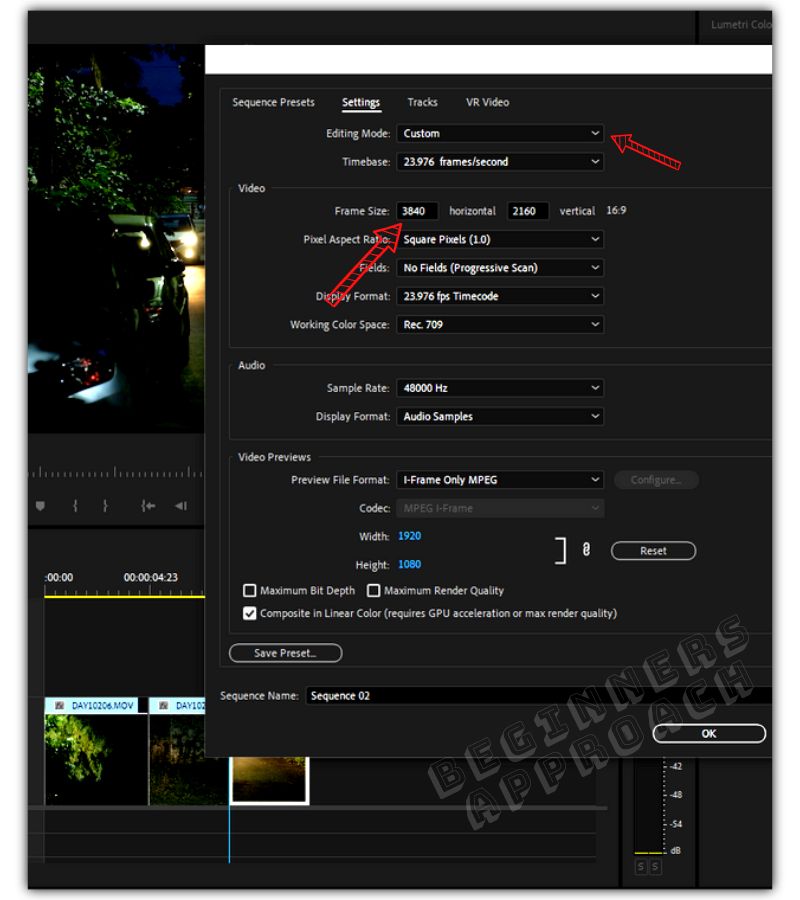
- Click on the "Settings" tab (side by side to the "Sequence Presets").
- Select "Editing Mode" to "Custom".
- Against "Frame Size", change the horizontal and vertical resolution to, say, "3840" and "2160" for a 4K UHD project.
- Click on the "Ok" button.
- You have successfully changed the resolution!
How to Change Resolution in Premiere Pro For Already Existing Sequence?
- In the "Editing" workspace, go to the "Projection Console".
- Correct-click on the sequence that needs to be updated and select "Sequence Settings".
- "Sequence Settings" window will be displayed.
- Against "Frame Size", change the "horizontal" and "vertical" resolution to, say, 1920 and 1080 for a 1080p Hard disk drive project.
- Click on "Ok". Washed!
In order to make a 1920 x 1080 video in Premiere, you need to set the "Horizontal" and "Vertical" values to "1920" and "1080" respectively, confronting "Frame Size" in the "Sequence Settings" window.
(To become the sequence settings, right-click on existing sequence and click "Sequence Settings" or go to "File" -> "New" -> "Sequence", for a new one).
You can update the resolution in the middle of your editing through the to a higher place steps.
How to Modify the Video or Frame Size in Premiere Pro?
To change the frame or video size, create a new Sequence by going to "File" -> "New" -> "Sequence" . In the " New Sequence " window click on the " Settings " tab. Select " Editing Style " to " Custom ". Confronting the " Frame Size ", modify the horizontal and vertical resolution to, say, "1920" and "1080" for an HD project.
(Changing the video size or the frame size or the resolution – all mean the aforementioned affair.)
Irresolute resolution of your timeline is piece of cake. The next thing you should know is the attribute ratio.
Yous must know what aspect ratio is needed for your last delivery.
Why Aspect Ratio is Important?
Aspect ratio determines the shape of your video – square, rectangle, vertical, broad, extreme wide, cinemascope, etc. You lot must know in what shape you will deliver. Knowing this earlier shooting will help you frame your of import action accordingly and prepare the right resolution while creating a new sequence in Premiere Pro.
How to Determine Attribute Ratio from your Footage?
To find the aspect ratio of your footage, divide the height from the width of your footage resolution. If your resolution is 1920 x1080p HD, then 1920 divided by 1080 is ane.78. In aspect ratio terms, it is called 1.78:1 (also called 16:9 / landscape / wide, etc.)
This is how your photographic camera, smartphone or screen recording captured your footage.
Next, you'll have to determine the aspect ratio for your final commitment (cinematic widescreen or vertical YouTube Shorts or square videos). This is something you should know yourself or become the information from your client.
Afterwards you know the attribute ratio, let's say, ii.35:1 which is a cinema widescreen, the next step is finding the height (or vertical value) of the frame size with respect to the width (or horizontal).
How to Discover Height or Vertical Value Based on Aspect Ratio?
Width (or Horizontal) value divided by the attribute ratio gives you the peak (or vertical) value for your video.
Allow me explain.
If your footage was originally shot at 4K UHD 16:ix, which is 3840 x 2160…
…and yous plan to deliver in widescreen cinema standard, say, 2.35:1…
…then to notice the required height, divide 2.35 from 3840, that is, 3840/2.35 = 1634.
Width/Attribute Ratio = Height
Therefore, your resolution should be horizontal – 3840 and vertical – 1634 to get the wide screen cinema wait of 2.35:1.
Refer the below table for different aspect ratios according to your terminal delivery or look.
(The resolution – width & height – is just for giving you an instance. Each attribute ratio could take multiple resolutions based on source footage and final delivery. The important thing is to notice the height by dividing the aspect ratio from the Width)
| Final Delivery Expect | Aspect Ratio | Aspect Ratio (in Decimal) | Width (Horizontal) | Acme (Vertical) |
|---|---|---|---|---|
| One-time TV Look | 4:3 | 1.33:1 | 1920 | 1443 |
| Common Wide Look 1080p | 16:9 | 1.78:i | 1920 | 1080 |
| Common Broad Await 4K UHD | 16:nine | 1.78:1 | 3840 | 2160 |
| Common Wide Wait 8K UHD | 16:9 | ane.78:1 | 7680 | 4320 |
| 35mm Motion Motion picture Standard – Hollywood Movies for 4K UHD | one.85:1 | 3840 | 2075 | |
| Widescreen Cinema Standard – Hollywood Movies for 4K UHD | 2.35:1 | 3840 | 1634 | |
| IMAX for 4K UHD | 1.43:1 | 3840 | 2685 | |
| Square Look | 1:1 | one:ane | 1080 | 1080 |
| YouTube Shorts, Instagram Stories – Vertical Videos | 9:16 | 0.56:1 | 1080 | 1920 |
How to Change Aspect Ratio in Premiere Pro?
To change aspect ratio in Premiere Pro, become to "File" -> "New" -> "Sequence", and click on "Settings" tab. Under the "Video" section, update the "vertical" value, which should be "horizontal" value divided past your aspect ratio, say, two.35, for a broad cinema expect. Horizontal/Attribute Ratio = Vertical. Attribute Ratio can merely be updated by altering the vertical (or horizontal) value of your footage.
This holds proficient when you are going to create a new sequence.
What if you lot built a sequence and are in the final stages of commitment and would similar to modify the aspect ratio?
There is an efficient mode for that equally well, which will be discussed in a few seconds.
What Should I Put in Horizontal and Vertical Frame Size Values for an Attribute Ratio of i.85:1 in Premiere Pro?
To become an aspect ratio of i.85:one, for a 4K UHD delivery, enter "3840" in "Horizontal" and "2075" in "Vertical" and for a 1080p HD commitment, enter "1920" in "Horizontal" and "1038" in "Vertical" in the "Sequence Settings" in Premiere Pro.
What volition Happen If I Drib a Footage on a Timeline with a Different Aspect Ratio in Premiere Pro?
When yous drop a 16:9 aspect ratio (or i.78:i) footage onto a timeline with two.35:one attribute ratio with the same resolution, then Premiere Pro will throw a "Clip Mismatch Alarm" popular upward. Click on "Continue exiting settings" to follow the timeline attribute ratio (as defined in the "Sequence Settings").
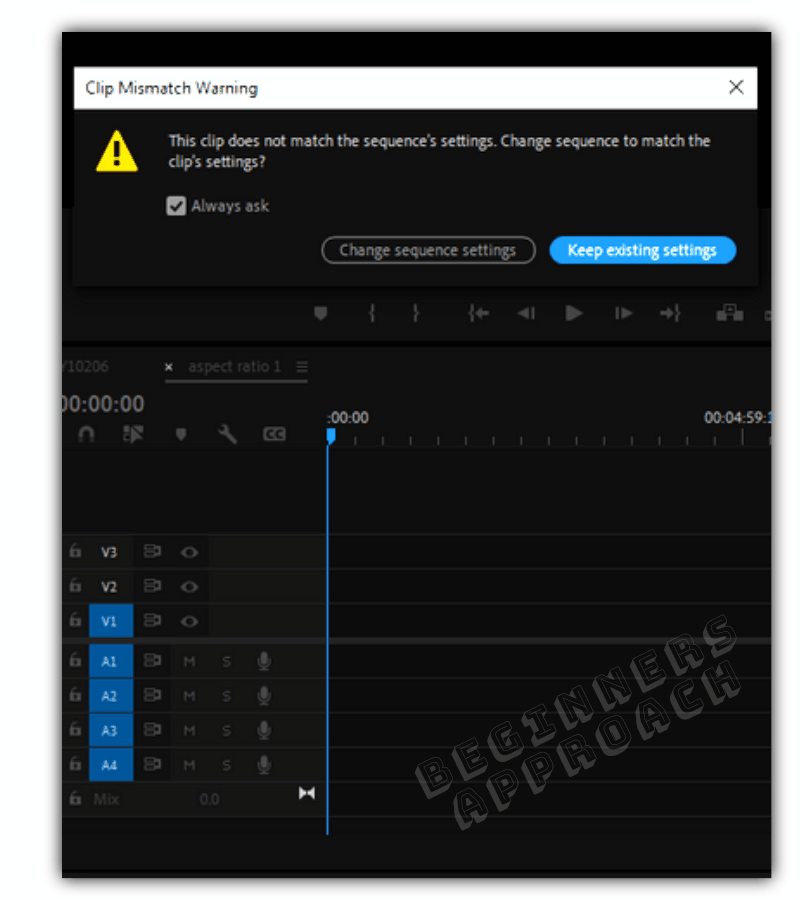
At the aforementioned time, at that place will be no blackness bars at the peak and bottom (also known as letterboxing). The video will exist zoomed in to fill the wide screen.
What will Happen If I Driblet a Lower Resolution Footage on a Timeline with Higher Resolution with Different Attribute Ratios?
When you drop a lower resolution footage of 1.78:1 aspect ratio on a college resolution timeline with 2.35:1, and so apparently the footage will exist surrounded with black bars from all sides. Correct click on the footage in the timeline and select "Set to Frame Size".
This will introduce black bars in the left and right (called equally pillar boxing). Zoom the video further in to fill the screen until there are no black confined.
If you lot want letterboxes or black confined on the acme and bottom for a cinematic look, do the post-obit:
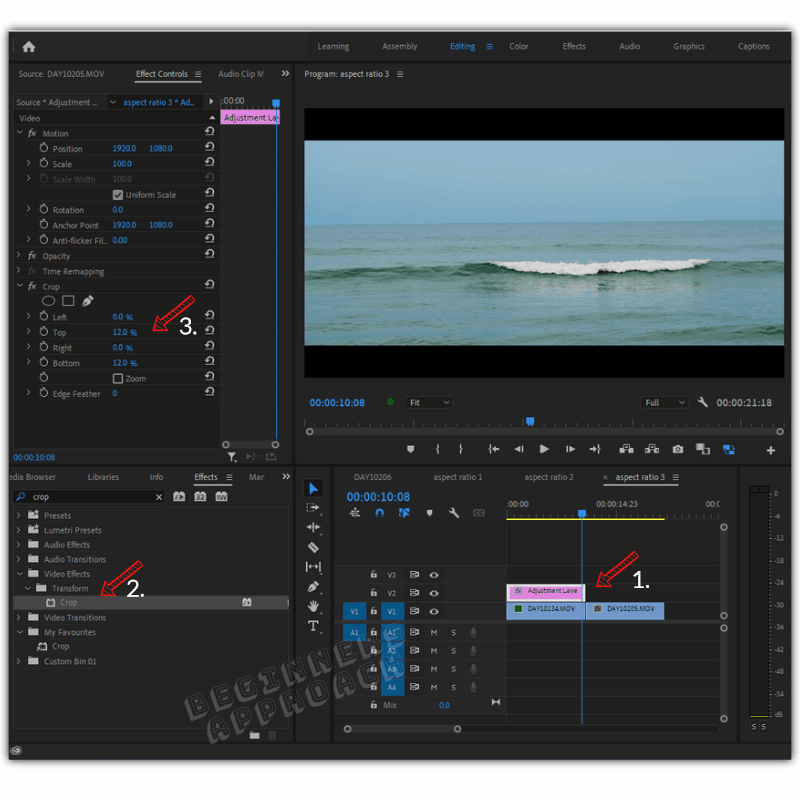
How to Add together Horizontal Black Bars to Multiple Clips in Premiere Pro?
- Become to the "Project Console" and click on the new item from the bottom correct.
- Click on "Adjustment Layer". Let the resolution exist the same as the timeline resolution.
- Elevate the adjustment layer and drop it on height of your prune in a different video rails.
- Become to "Furnishings" and search for "Crop". It will be under "Video Effects" -> "Transform" -> "Crop".
- Drag and drop the effect on the adjustment layer.
- Now go to the "Effect Controls" panel.
- Change the "Meridian" and "Bottom" crop values to, say, 12% to go the cinematic letterbox look. (Yous can play with different crop values to get the look you desire).
- Drag the adjustment layer to multiple clips!
Can I Change Aspect Ratio in Middle of Editing in Premiere Pro?
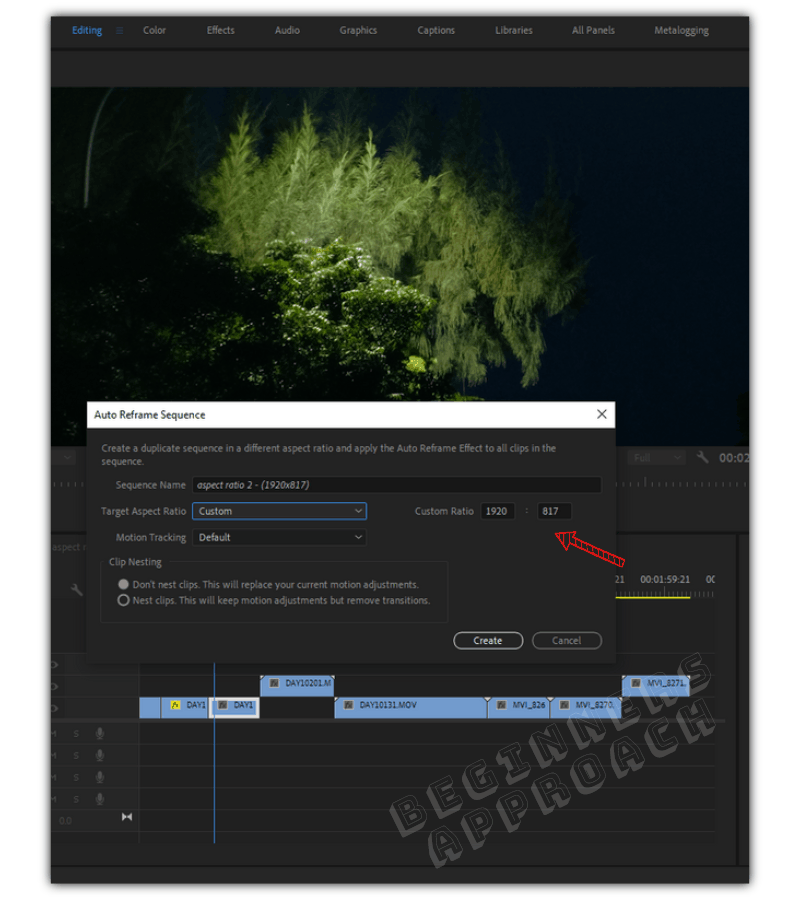
You tin can modify the attribute ratio of your timeline in the middle of editing in Premiere Pro. Yous have to brand utilize of Premiere Pro's feature called "Automobile Reframe Sequence" which provides different attribute ratios to cull from, similar foursquare 1:1, vertical 9:16, horizontal sixteen:9, and custom.
If you desire cinema wide screen and then you will accept to choose "Custom" choice.
How to Modify Aspect Ratio in Middle of Editing in Premiere Pro Instantly?
- From the "Project Console", right-click on the required sequence which has your timeline, and select "Motorcar Reframe Sequence…"
- Select the "Target Aspect Ratio" to your required i, say vertical 9:16.
- Permit the "Motion Tracking" be at "Default".
- Allow the clip nesting be at the default value.
- Click on "Create".
- Premiere Pro will clarify and create a indistinguishable sequence with the updated attribute ratio automatically!
- At present become through the clips. Premiere Pro does a very practiced task of keeping the main action in the frame.
- You lot tin all the same go alee and click on individual clips to arrange the framing using "Motion" parameters in the "Effect Controls" panel.
The "Motion" furnishings might exist disabled due to "Motorcar Reframe Sequence". Simply click on the "fx" to enable the effects.
Now become alee and play with the "Position" and "Scale" parameters to adjust the framing.
There are movies like Interstellar, Transformers, etc., which have more than one attribute ratios.
And if your project demands multiple attribute ratios in the same timeline, so there is a work-around for that.
How to Have Multiple Aspect Ratios in the same Timeline in Premiere Pro?
- Create a timeline with an aspect ratio that the majority of the clips share.
- So choose which clips need different aspect ratios.
- Go to the "Effects" console and search for "Crop". (It will be under "Video Effects" -> "Transform" -> "Crop").
- At present go to the "Effect Controls" panel.
- Alter the "Tiptop", "Bottom", "Left" or "Correct" crop values to get letterbox or pillarbox (vertical confined on the sides) black bars.
- Follow the same method for clips that demand different aspect ratios.
- Done.
You may be too interested in the beneath posts:
seven Reasons Why Premiere Pro is Expert for Audio Editing
Is Premiere Pro Good For YouTube? (For Beginners)
Can Premiere Pro Record Screen? (Quick Tips & Techniques!)
Source: https://beginnersapproach.com/premiere-pro-change-resolution-aspect-ratio/
0 Response to "How To Change Project Settings In Premiere Pro"
Post a Comment